A nifty window layout switcher for macOS using Hammerspoon
I’m a sucker for screen real estate, and thus I use 2 32" 4k monitors so I can see most of my apps’ windows simultaneously, instead of switching back and forth between them.
#myworkplace is pretty lean (on cables) and mean (on screen real estate). And a lot of tileception goes on (window tiling, then local tmux tiling, then 1-2 levels of remote tmux tiling) pic.twitter.com/wCqsusBfRb
— Shantanu Goel (@shantanugoel) August 10, 2020
I use the awesome Rectangle app that provides shortcuts to move/resize an app window to my liking. However, this goes for a toss whenever I disconnect my laptop, or reboot it. macOS can’t seem to reliably remember where to put the windows at such events and I’ve to keep playing this game of doing a lot of alt-tabs and rectangle keyboard shortcuts to get my app windows back where I like them. So, I spent some time recently to whip up a short hammerspoon script that allows me to do this easily.
local laptopScreen = "Color LCD"
local leftMonitor = "Acer ET322QK"
local rightMonitor = "B326HK"
-- Define position values that don't exist by default in hs.layout.*
local positions = {
leftTop = {x=0, y=0, w=0.5, h=0.5},
leftBottom = {x=0, y=0.5, w=0.5, h=0.5},
rightTop = {x=0.5, y=0, w=0.5, h=0.5},
rightBottom = {x=0.5, y=0.5, w=0.5, h=0.5}
}
local layoutTripleScreen = {
{"Google Chrome", nil, rightMonitor, positions.rightBottom, nil, nil},
{"Joplin", nil, rightMonitor, positions.rightTop, nil, nil},
{"Cider", nil, rightMonitor, hs.layout.left50, nil, nil},
{"Google.com Mail", nil, leftMonitor, positions.leftBottom, nil, nil},
{"Hangouts Chat", nil, leftMonitor, positions.leftTop, nil, nil},
{"Firefox", nil, leftMonitor, positions.rightTop, nil, nil},
{"iTerm2", nil, leftMonitor, positions.rightBottom, nil, nil},
}
local layoutSingleScreen = {
{"Google Chrome", nil, laptopScreen, hs.layout.maximized, nil, nil},
{"Joplin", nil, laptopScreen, hs.layout.maximized, nil, nil},
{"Cider", nil, laptopScreen, hs.layout.maximized, nil, nil},
{"Google.com Mail", nil, laptopScreen, hs.layout.maximized, nil, nil},
{"Hangouts Chat", nil, laptopScreen, hs.layout.maximized, nil, nil},
{"Firefox", nil, laptopScreen, hs.layout.maximized, nil, nil},
{"iTerm2", nil, laptopScreen, hs.layout.maximized, nil, nil},
}
local appNames = {
"Google Chrome",
"Joplin",
"Cider",
"Google.com Mail",
"Hangouts Chat",
"Firefox",
"iTerm",
}
local function launchApps()
for i, appName in ipairs(appNames) do
hs.application.launchOrFocus(appName)
end
end
local menu = hs.menubar.new()
local function setSingleScreen()
menu:setTitle("🖥1")
menu:setTooltip("Single Screen Layout")
hs.layout.apply(layoutSingleScreen)
end
local function setTripleScreen()
menu:setTitle("🖥3")
menu:setTooltip("Triple Screen Layout")
hs.layout.apply(layoutTripleScreen)
end
local function enableMenu()
menu:setTitle("🖥")
menu:setTooltip("No Layout")
menu:setMenu({
{ title = "Launch Apps", fn = launchApps },
{ title = "Set Triple Screen Layout", fn = setTripleScreen },
{ title = "Set Single Screen Layout", fn = setSingleScreen },
})
end
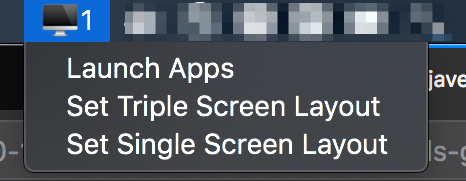
enableMenu()
The script creates a list of apps that I like to be open while working and defines two layouts for them (One when monitors are connected thus giving me 3 screens, and one when I’m working solely off the laptop). It also puts a handy menu in the menubar that allows me to launch the apps or switch between various options. It also shows a number “1” or “3” adjacent to the menu icon to display what layout I’m currently using. Pretty nifty!