Bypass ISP DNS hijack by changing DNS port on Ubiquiti USG router
The Background#
We talked earlier about how certain ISPs block websites by using DNS hijack methods and I had recommended using DNSCrypt to bypass it. Well, as part of my home network overhaul, I moved over from the consumer grade (but still decent enough) Asus router over to Ubiquiti stack which, among other things, lead me to use their “Unify Security Gateway (USG)” as the router. Now, this router is pretty decent and is running Ubiquiti’s EdgeOS (derived from Vyatta OS, which in turn is based on linux/debian). You can install and tweak a lot of stuff through command line if you’d like but alas there’s no dnscrypt-proxy available for it.
I had the below options now to overcome my ISP’s DNS hijacking:
Compile dnscrypt manually and use it
Run dnscrypt on another server/device internally (maybe my NAS or the ubiquiti cloudkey or something)
Use one of the other options I had originally discussed (hosts file, VPN, alternate port)
I rejected the first option as it meant setting up a cross compilation environment just for one program and also it may be hard to keep up in future. The 2nd option wasn’t too good either as I didn’t want my network infrastructure’s basic need of DNS to depend on another device which may not be as resilient due to other regular use. From the other earlier discussed alternatives, I didn’t want to do the manual upkeep of hosts file or fall into the expensive/slow/insecure trap of VPNs. So I settled on the next best solution of using an alternate port for my DNS queries, with the hope that the ISP is dumb (or cost conscious) enough to rely only on port number to higjack DNS and not use DPI for it (even though they do use DPI for at least some types of blocking).
Testing the Waters#
First thing was to try whether this would even work or not. So I tried it easily by querying for a blocked torrent site first through ISP’s DNS servers, then OpenDNS servers on default DNS port (53) and then Open DNS servers on port 5353 (Yes, OpenDNS responds to dns queries on 5353 as well, fortunately.)
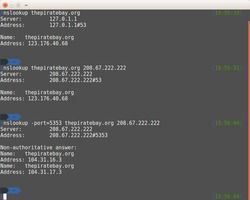
In the first 2 attempts, the IP returned was my ISP’s hijacked reply (pointing to their own generic server that they use to respond to blocked site requests) but in the last one (using port 5353), the DNS request went unmodified and came back with the real IP of the website. Success!
Configuring the USG#
So, on to the real deal. USG does have a UI option in the Unify Controller software to set custom DNS servers. However, it takes only IPs and not ports. This is understandable as I found out after going through resolv.conf manpages and several old discussions. resolv.conf’s support for alternate ports has been discussed several times and rejected in favor of other system wide solutions.
I had a thought to use iptables to forward all requests going out to WAN port 53 to port 5353. But, this is like using a shotgun to pop balloons. Firewall solutions like this should be used rarely as they strain the traffic processing as they build up quickly.
USG uses dnsmasq though, so there was hope. DNSmasq allows to set ports as well for nameservers as per its manpage. So, the problem statement was thus as below:
Don’t use resolv.conf at all (to avoid ISP’s DNS servers or any other DNS servers leaking traffic onto port 53)
Set OpenDNS nameserver ip/port in dnsmasq for all sites (Generally folks use it for specific sites, but the configuration syntax is flexible enough to mould it anyways and we can set it as a generic server too)
There’s no UI option for this though, so you’ve to drop down to the CLI. Launch an ssh session to the USG ip and use the credentials that you’ve set in the unify controller to log in. Then run the below set of commands. The procedure is slightly different from a regular linux box (where you’d directly edit dnsmasq.conf) due to the specific nature of config management of ubiquiti devices.
# Switch to configuration mode
$ configure

# Below commands will generate the appropriate dnsmasq.conf automaticall
# Don't use resolve.conf
$ set service dns forwarding options "no-resolv"

# Set the opendns nameserver for all sites
$ set service dns forwarding options "server=208.67.222.222#5353"

# Generate the config files, save and exit
$ commit;save;exit
Now, you can try browsing (or doing nslookup) for the blocked website and it’ll go through succesfully. Note that like all other CLI changes for USG, the above changes can be lost whenever you make some other config change through UI or update USG firmware. To make it persistent across such events, you need to follow the config.gateway json process.