Browser controlled Raspberry Pi Camera Car
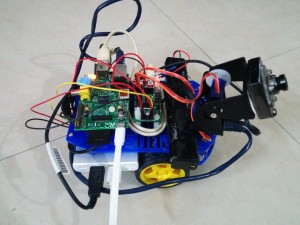
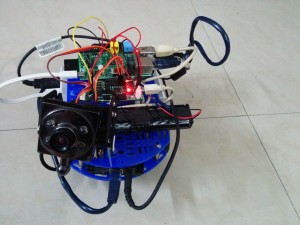
Spent this weekend building a remote controlled car with a live camera feed with a Raspberry Pi doing the communication and brains duty. Pretty nice real time movement control and camera pan/tilt control through websockets with a live stream feeding back to any browser directly from the car through mjpg-streamer
(PS: Video is at the bottom of the post. Browser/video on TV courtesy ChromeCast. Casted my Nexus 5 screen to the TV simultaneously while controlling the car :) )
Code: https://github.com/shantanugoel/raspi-car


HW Used:
- Dagu Chassis (Includes motors/tires and the plates)
- Dagu Pan/Tilt kit (Servos and brackets to mount the camera)
- Dagu Mini Driver (Arduino clone + Motor driver)
- Raspberry Pi (Model B but any could be used)
- A netgear ethernet to wifi adapter (Since I didn’t have the raspi cam so had to save a USB port and use this instead of USB wifi adapter)
- A cheap old USB webcam
- 6 AA Cells
- A sony portable charger to power the raspberry pi and wifi adapter
- Wires/Screws/Spacers/Tools (lots of them)
Features:
Control the car from any browser
Can control motion as well as camera pan/tilt from browser using virtual joysticks (Requires multitouch to do pan/tilt as second joystick is needed for this)
Streams back video from car camera to the browser
Can rotate left/right while being completely stationary
Can have multiple connections to the car (not recommended for controlling)
Uses websockets for control and response is almost instantaneous like regular toy cars.
Responsive touch-anywhere joysticks using virtualjoystick (https://github.com/jeromeetienne/virtualjoystick.js)
HW Setup overview:
Raspberry Pi connects to the USB webcam and Dagu Mini driver through second USB port (for serial comm)
Raspberry Pi powered by micro USB through portable charger
DAGU mini driver powered through a 6 AA battery pack (which powers the motors/servos as well)
Servos connected to Digital Pins 2 and 4
Motors connected to Pins 8-11
Wifi adapter powered through portable charger and connected to Pi through ethernet port
SW Setup Overview:
Use any Raspberry Pi software image. I used vanilla raspbian
Get all my code from my github: https://github.com/shantanugoel/raspi-car
Compile and start mjpg-streamer using mjpg-streamer.sh (Compilation not needed if using my repo as I included a compiled version of mjpg-streamer and needed plugins)
Start websockets and Dagu communication driver back end: controller.py (python controller.py)
Open browser to
http://rpi:8090(orhttp://<RaspberryPiIPAddress>:8090) from any deviceTouch anywhere to start controlling the car. Left half of screen corresponds to car movement joystick. Right half of screen corresponds to camera pan/tilt joystick. You can use either one of them or both simultaneously.
Some Important Points:
Found that you can’t use standard Servo library along with DC motors as it disables the PWM on pins 9 & 10 as it uses Timer 1 (Should have read the manual in the first place :| )
Used ServoTimer2 library to avoid this (since it uses timer 2) but it didn’t compile. Got it compiling and is added to my github repo as well so you can use it too.
ServoTimer2 disables use of digital pin 3 for servo. So had to use pin 4 for tilt
Raspberry Pi has a back power connection somehow through its full USB port :o Avoid this as much as possible and power on the Pi first and then the battery pack on the Dagu mini driver
The Sony portable charger is pretty nice and the power on/off button actually came in handy though I generally detested it otherwise. This helped in turning off the Pi (CP-F10 L is the model name if you want)
There is a nice voltage monitor on the Dagu on analog pin 7. This helps in keeping track of the battery levels and can be used to shutdown the car when needed.
Servos get driven by the USB power as well but motors require battery power for sure