Tips: Configure FTP upload support for wordpress in Blogjet
A few days ago, I had written about a wonderful blogging tool Blogjet. Now, if you host a wordpress blog, you’d be aware of the fact that for wordpress to be able to upload yor files (images, attachements in post etc) to the server, you have to make the upload directory writable by all. Now, this is a BIG security risk. Some people go to the lengths of CHMOD’ding their upload directory for a short while and after upload, restoring the apt file permissions back. Some upload their files separately through ftp. But Blogjet has a very cool feature. It supports uploading all your non-text content to your webspace not only by using wordpress APIs but also through ftp if wordpress doesn’t have necessary permissions to write files on your server. This saves you a lot of time, that you can then devote on writing the actual post instead of meandering around with the “technicalities”. But many a people have a heart-ache configuring the ftp with Blogjet, although it is quite simple really. This is basically due to conflicting and confusing instructions existing on the ‘net. So, here I present to you step by step, simplest instrutions to configure this. Read on.
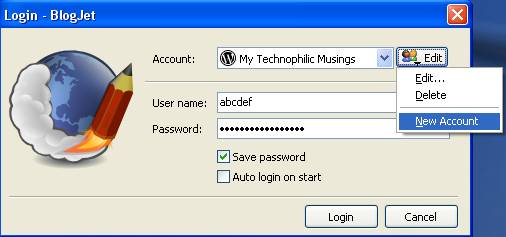
Step1) Launch Blogjet. You will be presented with a login screen (shown below). You can create a new account or choose to edit an existing one.
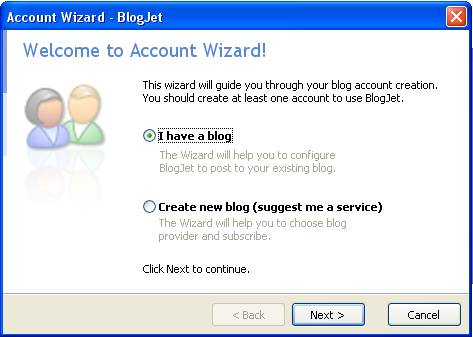
Step2) Choose “I have a blog” on the next screen. Press next.(You might not get this screen if you are editing an old account. In that case, skip to Step 3)
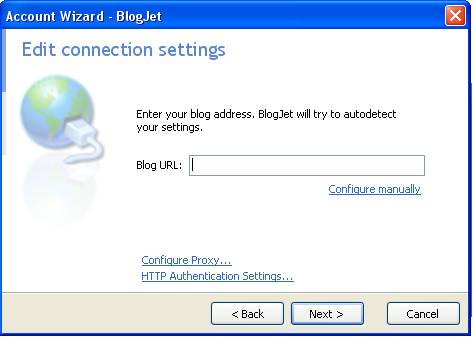
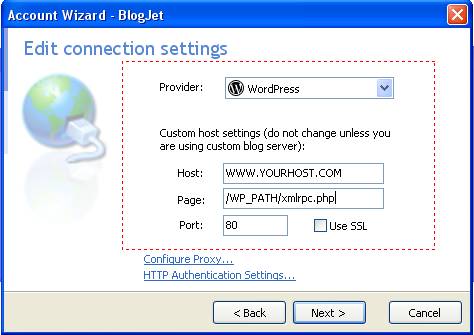
Step3) In the “Edit connection Settings” dialog, click on “Configure Settings Manually”.
Step4) In the Connection settings dialog, there are two options for wordpress blogs. “Wordpress” and “Wordpress (Direct Upload)”. Choose “Wordpress”. The direct upload feature is for people whose wordpress installations have necessary permissions to create files on the server.
Step5) Enter the username and password for your blog.

Step6) Now, you get the FTP Configuration screen. Check out the image below and then read the instructions for filling up various columns.
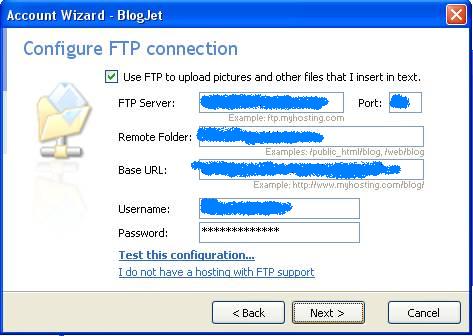
i) Tick the checkbox which says “Use FTP to upload pictures…..”
ii) FTP Server: ftp address for your server. e.g.: ftp.mysite.com .If you don’t know this, then you should contact your webhost support staff to know about this.
iii) Port: Generally ftp port is 21. However, if you are not sure, then ask your webhost support staff to get the exact number.
iv) Remote Folder: This is the folder where you want to upload your stuff but is relative to the path where your ftp connection lands you. You’ll need to make a manual ftp connection to your ftp server first to check this. Check the examples after next step.
v) Base URL: This is the complete web path, that wordpress (or any user over the web) will use to access the image.
Examples: If your ftp server address is ftp.mysite.com, and your wordpress blog address is http://blog.mysite.com . Your file directory structure is something like given below:
/->
/public_html ->
/public_html/wordpress
/another_folder
When you connect to ftp manuall, you land up at “/”, you make a new folder at /public_html/wordpress/uploads, where you are going to upload your files. And your blog address http://blog.mysite.com points at /public_html/wordpress/ when you go to it through your web browser, then your field values will be:
Remote Folder: /public_html/wordpress/uploads
Base URL: http://blog.mysite.com/uploads
Notes: So, basically what you can do is for remote folder, connect to ftp, “cd” to the folder where you want to upload and do “pwd”, this is your remote folder address. For Base url, find out, where your blog address points to (take help of your webhost support if u need), then find your upload folder’s path relative to it, and add that relative path in front of your blog address.
vi) Username/password: This is your ftp username and password given to you by your webhost.
vii) Now, click on “Test this configuration”. If everything is ok, then you’ll get a “FTP Configured properly” message as shown below. Then click ok and next.

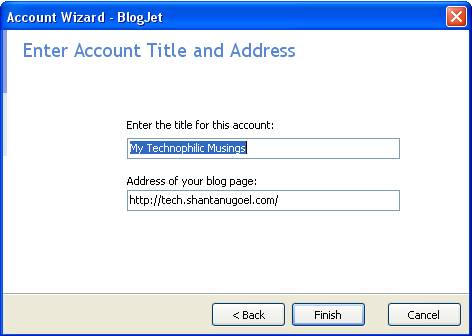
Step7) Click on finish. You are done.  . Do let me know if this worked for you or you had any issues.